poultrykeeper logo

Candling Eggs

Candling Eggs

Candling eggs is a straight-forward process, you can even use a household torch, but it helps to have some pictures to know what you’re looking for inside the egg. 

In this article, there are more than 20 images and video clips with detailed explanations, so you should be able to get a good idea of what to look for when candling your eggs.

We candle eggs before incubation to look for cracks. These allow bacteria to enter during incubation. Cracked eggs are likely to become infected, causing the embryos to die prematurely.

During incubation, we can use egg candling to identify fertile eggs. You can also remove non-viable eggs (infertile or early death), which will potentially become rotten.

Rotten eggs can sometimes explode, contaminating fertile eggs, not to mention the inside of your incubator! We’ve all heard the saying “stinks like rotten eggs”, so the last thing you want is a rotten egg exploding in the incubator.

A ‘viable egg’ is fertile, and we hope it will develop into an embryo in the incubator and eventually hatch into a chick.

Cracked Egg
A hairline crack in an egg which could allow bacteria in and isn’t suitable for incubation.

Beginners candling eggs FAQ's

Egg candling is when we shine a bright light into an egg to see inside it. During incubation, candling an egg allows you to see the developing embryo inside the shell and provides a way to remove non-viable eggs.

Commercially, this enables egg packers to remove eggs with hairline cracks, blood-spots, or other undesirable contents. 

The term ‘egg candling’ comes from the past before electric light bulbs when people used candles for light. Poultry breeders would place a candle inside a wooden box and cut a hole big enough to allow light to shine through the egg but small enough to stop the egg from falling into the box.

Candling does not damage the embryos inside the egg, providing you maintain the temperature of the egg.

Don’t keep eggs out of the incubator unnecessarily, and don’t overheat the egg if using an egg candler with a bulb. Modern LED versions do not give off heat and are a better option.

Egg candlers can be mains powered or battery operated. They tend to come in two varieties: The first is like a torch with a rubber seal around the end, and the second is a table-top unit with a place to sit the egg. 

To be honest, a small ultra-bright torch is all you need, you can use your hand between the egg and torch to make a good seal.

Most candlers today use light-emitting diodes (LED’s) rather than electric bulbs. The advantage of LED is that it produces a bright white light without much heat. 

I have tested several egg candlers, and in summary, I would not waste money on some of the cheap imported versions. The seal between the light source and the egg is not as good and doesn’t last. The LED is not usually very bright.

There are two egg candling devices I recommend and use regularly:

  • This ultra bright, LED Torch.  I found normal LED torches with batteries go dim as the batteries age, this one is rechargeable and you can top it up from time to time to keep it super bright. 
  • This ultra bright Titan Egg Candling device. I like this one because you don’t have to hold it. It sits on a surface and you can place an egg on the top.

Some large eggs can have more than one yolk. Double yolk eggs (or “double yolkers” as they are sometimes called) are the most common.

Double yolk eggs rarely hatch since the space and resources inside the egg are limited. If they do hatch, one or both can be deformed or much smaller.

When a chick hatches, it needs to rotate inside the shell to break free from its shell, which becomes almost impossible when there are two chicks inside an egg. There are some success stories, and they almost always need assistance in hatching.

As well as checking egg viability, candling eggs can free up space in your incubator. If you use a separate hatcher for the last few days of incubation (I find this is easier to clean), you can keep your incubator topped up with more eggs!

When should you candle eggs?

The most critical period of incubation during the embryo’s development is during the first few days, so it is advisable not to disturb your eggs during this time. It is hard to see anything anyway, maybe a tiny dot, but you aren’t missing anything exciting. The last few days of incubation are also not recommended for candling since the chick moves into position to hatch.

I recommend candling chicken and duck eggs after 7 days of incubation and again at 14 days.

After a week of incubation, you can be reasonably precise about the viability of the embryo. At 14 days, you can remove any eggs with embryos that have died and lessen the risk of a rotten egg exploding.

After 14 days, it isn’t easy to see much inside the egg because the chick takes up a lot of the egg. Usually, I don’t disturb eggs again after 14 days, but some people will recheck them when you stop turning them a few days before they hatch.

If you are concerned about the right humidity, you may want to check them more often to check the air sac size (more on this later), but I suggest avoiding the first and last few days of incubation.

How to candle eggs

First candling: 7 days

Showing inside of an egg
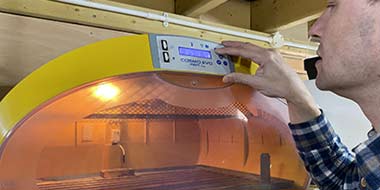
After a week of incubation, place your egg onto your egg candler in a darkened room and turn on the light. You should be able to see shadows from inside the egg. With practice, you will identify fertile eggs by the dark dot, the embryo and the spider-like blood veins spreading out around the egg.

Sometimes, it’s hard to see the embryo, and it might be in the centre or opposite side of the egg. Rotate the egg until you get the best view. If you’re still not seeing it clearly, then it’s best to wait another day or two before trying again.

If the embryo happens to be up against the side of the shell, it will be much easier to see, and if you look carefully, you can sometimes see movement. If you are lucky, you may see the heart beating!

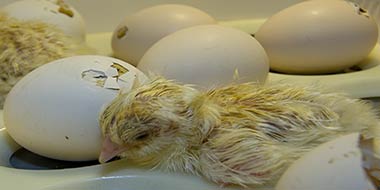
How can you tell an egg is fertile?

After a week of incubation, if an egg is fertile, you will see the embryo starting to develop as a dark spot with spider-like veins stretching out around it. Sometimes it isn’t possible to observe the embryo if it’s in the centre of the egg or if the eggshell is thick or a darker colour.

If an egg is infertile, you will only see the yolk’s shadow inside the egg without the embryo or veins. We sometimes call this a “clear” egg.

Fertile Egg Day 7
Day 7: A viable, fertile egg. The embryo in the middle, and spider-like veins are stretching out into the yolk, supplying nutrients.
Clear infertile egg
Day 7: A clear egg. This egg will not develop. The egg yolk floats, it can be seen as a darker area towards the top before the air sac.

Embryo deaths

There are four distinct periods of incubation when embryos can die, and I provide common reasons for these losses in my incubation troubleshooting guide.

For the 7 and 14 days candling eggs photos I show in this guide (to remove non-viable eggs), and a successful hatch, we only really need to consider two high-risk periods for embryo death: At the beginning of incubation and just before the chicks hatch. Remember to expect some losses, on average; commercial hatcheries have 85% of their fertile eggs hatching.

Early embryonic death

We expect to see either fertile eggs or clear eggs, as shown in our first candling after seven days, but occasionally the embryo starts to develop in a fertile egg and then dies. We call this “early embryonic death” or sometimes just “early death”.

A thin ring around the inside of the egg indicates an early death. The embryo died at the start of incubation, usually within a couple of hours. These eggs are easy to identify and remove, and I have included a photo below.

The second common type of early embryonic death occurs when the embryo starts to develop and dies within the first week. We call these slightly later embryo deaths “quitters“. Eventually, the rest of the contents of the egg will become cloudy as the egg deteriorates. You can see this in the second photo below. The contents may swish around when rotating the shell.

Blood Ring Early Embryo Death
Day 7: Early Death of the embryo. A thin ring around the inside of the egg which usually occurs very early on (hours) into incubation.
Cloudy Early Embryo Death
Day 7: A quitter. We see the embryo; however, contents are cloudy and move around. This occurs a day or more into incubation.

There are more candling photos in the gallery at the end of this article.

Video: candling eggs at day-7

Sometimes, I find it challenging to identify a quitter, especially if it’s only the embryo that’s cloudy and not the whole egg. If I’m unsure, I will leave the egg until day 14, when it will be much easier to identify positively. I have taken a photo of such an egg for day 14, candling photos below and a video clip of another. It is cloudy and hasn’t developed veins like other eggs.

The most common cause for early embryonic deaths in eggs is rough handling, incorrect storage (storing too long, or at the wrong temperature), adverse genetic traits, or ageing of the breeder flock.

We can’t always avoid these (for example, when hatching eggs go through the postal system), but some can be corrected easily.

Embryo deaths later during incubation are all preventable with some care.

Nutrient deficiency of the breeder-flock, incorrect temperature, humidity (which causes egg weight loss during incubation) or egg turning inside your incubator, an infection caused by bacteria, and the breeder flock’s age is also essential.

Dirty eggs or an un-sterilised incubator are apparent sources of bacteria. Eggs should be clean before going into your incubator but remember bacteria can be transferred to eggs when you are candling if you haven’t washed your hands.

Video: a "quitter" or dead embryo

Second candling: 14 days

There has been a lot of development after 14 days of incubation. The embryo is fully formed and starting to take up most of the space inside the shell. There are some photos below.

The embryo is less active from now on, so you are less likely to see movement.

Day 14 of incubation
Day 14: The egg is getting full. It's harder to see inside. Try looking from both ends.
Day 14 of incubation
Day 14: Another viable egg, it's hard to see inside. Veins are visible beneath the chick.
Early embryo death
Day 14: An early embryo death (a quitter) that was difficult to see at day 7. I removed it from the incubator and investigated.
Contents of a bad egg
Contents of the same egg which was also starting to smell. They go bad quickly and if left, can explode in the incubator.

Video: candling eggs at day 14

Candling before the hatch

You can candle again after 14 days but not after you’ve stopped turning your eggs during the last few days before they hatch. We finish rotating chicken eggs at 18 days and duck eggs at 25 days. After this time, the chick is positioning itself, ready to emerge.

Some books suggest candling eggs at 18 days; however, I don’t usually look at them again after 14 days. You can’t see much other than the increasing air sac size, and the egg is full up with a chick!

The exception to this is if I have hatching problems that I suspect are caused by incorrect incubation humidity, then I will mark the size of the air sac onto the eggshell using a soft pencil and compare it with a known good egg. More information is coming up below on air sac development, where I have included a handy chart.

Candling dark shelled eggs

Dark shelled eggs (Such as Marans or Welsummer Eggs) are much harder to see through, so you will need the brightest light source you can get.

One idea is to practice candling light eggs first or incubate with lighter coloured eggs, and then you have a comparison.

You will need to candle in a dark room to stand a chance. If you still can’t tell, you will have to wait longer until the embryo has developed further.

Coloured Eggs in Incubator
Three different colour eggs in my incubator tray. Light Sussex eggs at the front, Copper Black Marans in the middle and light blue Crested Cream Legbar at the back.
Dark Brown Shell
Day 7: A dark brown Copper Black Marans egg. Much harder to candle but can be done in the dark with a little practice.
Another Dark Brown Shell Day 14
Day 14: The same dark brown Copper Marans egg. It's even harder to see much inside the egg as the embryo develops.

What is happening inside the egg?

The image below should give you an idea of what is going on inside the egg by day 8. I have used black and white photography to highlight the contrast. There are probably a few more blood than I have drawn, but I think this gives you a good idea of what’s inside the egg.

The embryo has grown significantly, and the eye is usually visible (the darkest ‘blob’ you see in the egg). There are digits on the feet, the heart enclosed in the thoracic cavity, and the embryo starts to look more like a chick. Feathers begin to grow from day 8.

There is a sack attached to the embryo that is called the allantois. This goes around the back and head of the embryo and holds the waste. It is the yukky bit you’ll find left in the shell when the chick hatches. The yolk sack is now very red and full of blood vessels that go out into the albumen (egg white). The air sack at the broad end of the egg has increased in size.

Artist impression embryo inside eggshell
My sketch of what's going on inside a chicken egg by day 8.

The BlastodiscNext time you crack open an egg, look carefully for a small white patch on the surface of the yolk about 3mm in size. This is called the blastodisc. This is where the sperm joins the egg. Once fertilised, the blastodisc changes its name to the blastoderm.

The blastoderm contains the chick’s genetic makeup, and it’s from here that the egg starts to develop. Blood vessels start to appear, stretching into the yolk to carry nutrients back to the embryo.

Of course, it would be great to be able to sex eggs before they hatch to save the heartache of raising unwanted male chicks! Various old wives tales circulate that say you can tell by circling a key or piece of metal on a string above an egg or that male chicks hatch from pointed eggs, females from round ended eggs. I’ve even seen ‘egg sexers‘ advertised on eBay where the seller says, “I don’t know how this works… it just does”.

Unfortunately, there is no proven way to tell the sex of an embryo in the egg, well, almost. The only proven way has been inserting a needle and taking a sample from inside the shell to see whether there was estrogen hormone present. Hardly a suitable method for the backyard keeper.

If there was an easy way, I’m sure the poultry industry would be using it now.

For autosexing breeds, or sex-linked crosses, you can determine the sex of day-old chicks, but for most pure breeds, you have to wait a while before you can sex them.

Incubator temperature should be maintained between 36 and 37.7°C (99° to 100°F); ideally, it should be set to average 37.5°C (99.5°F).

Too high a temperature is more damaging than too low a temperature. Mortality will increase if the incubation temperature drops below 35.6°C (96°F) or rises above 39.5°C (103°F) for several hours.

The final days to hatching

Eventually, the chick will fill almost all of the space inside the egg, and the air sac will increase further in size (see the diagrams below). When it finally hatches, it will break through the inner membrane into the air sac to take its first breaths of air. It will crack/push through the shell with its egg tooth (attached to the end of the beak). The eggshell hole allows further oxygen into the air sac so the chick can continue to breathe.

Over the final 24 hours, the chick absorbs the remainder of the yolk sack, and this will give it enough energy to turn inside the shell and slowly break from the shell as it goes. It will then use its feet to push itself out.

As I’ve already said above, I think there is little point in candling eggs during the final few days other than to check for the air sack size because you will not see much. The chick almost fills the shell.

How to build a candling lamp

If you are on a budget, you could build an egg candler. Place a desk lamp (using a bright low energy light bulb) inside a cardboard box. Cut a small, round hole in the top of the box, just big enough for the pointed end of your egg.

Alternatively, modern LED torches that do not give off much heat are also an excellent light source for candling eggs. I took this photo with a flashlight, using my hand to form the seal with the egg, and I could still see the embryo!

Flashlight as a candler

Air-sac development

One way to confirm the humidity of your incubator is correct is to monitor the air-sac size. The images below show you the relative air sac sizes at different incubation stages for chicken and duck eggs.

Air Sac Development
Check your eggs are losing enough moisture during incubation by candling and using this Air Sac Development Diagram.Click to Tweet

Monitoring temperature & humidity

A 'high-tech' solution

Some incubators don’t always maintain the correct temperature and humidity. Humidity is tough to get right over the incubation period, and even incubators with automatic humidity control can fluctuate or run dry.

I found a rather neat, high-tech solution to this problem (which costs about £20).

SwitchBot
Wireless Temperature & Humidity

I use a Switchbot wireless sensor in my incubator and SwitchBot App on my phone. I can view temperature and humidity and a graph with AVERAGES since the start of incubation. I can adjust humidity to get the average right over the incubation period.

Most incubation problems are caused by incorrect humidity or by the health of the flock. We need to maintain the correct AVERAGE humidity over the incubation period (45% for chicken eggs).

The SwitchBot Sensor records the humidity and shows the average. You can compensate if it is too high or too low.

If the temperature suddenly increased or decreased (for example, a power cut), then you can set a notification for your phone.

The sensor works via Bluetooth. I also added the SwitchBot Mini-Hub (£25), which connects to the internet, allowing me to view all my sensors over wifi and away from home.

Egg candling photo gallery

Light 'em up!

Here is a photo gallery of some of my egg candling photos: day 7, Day 14 and a couple of eggs with dead embryos.

Next Steps

When you know you have chicks on the way, it’s a good time to start thinking about raising chicks and setting up their brooding area, which is the subject of the next article!

Related Posts:

How to help a chick hatch
Incubating, Hatching & Brooding Chicks
How to Help a Chick Hatch

In this guide, Gail Damerow will help us to understand why a chick can’t always make it out on its own, why it’s not usually a good idea to intervene, and if you do decide to assist, how to help a chick hatch.

Read More »
Breeding Quail
Keeping Quail
Breeding Quail

Quail are becoming more popular to keep for their delicious eggs but if you would like to increase your stock

Read More »
How to Help a Chick Hatch

In this guide, Gail Damerow will help us to understand why a chick can’t always make it out on its own, why it’s not usually a good idea to intervene, and if you do decide to assist, how to help a chick hatch.

Read More »

On this page:

You might also enjoy:

Incubation Humidity
Incubating, Hatching & Brooding Chicks
Incubation Humidity

What is the correct incubation humidity for hatching eggs, and how do we measure it? How to get the right humidity for chicken, duck, goose & quail eggs.

Read More »
How to help a chick hatch
Incubating, Hatching & Brooding Chicks
How to Help a Chick Hatch

In this guide, Gail Damerow will help us to understand why a chick can’t always make it out on its own, why it’s not usually a good idea to intervene, and if you do decide to assist, how to help a chick hatch.

Read More »
Setting Up Incubator
Incubating, Hatching & Brooding Chicks
Setting Up Your Incubator

Success using an incubator isn’t guaranteed, especially with some of the cheaper models available. Getting good results at hatch time

Read More »
188