Incubation Humidity Guide

Getting incubation humidity right for a successful hatch can be challenging. The advice also varies wildly from different sources, adding to the confusion.
This guide explains what humidity we require, how to measure it correctly and provides reliable methods for setting the proper incubation humidity for hatching eggs in an artificial egg incubator.
Humidity and the egg
Why humidity is important for hatching eggs
An eggshell is porous. It allows oxygen to pass through to the embryo developing inside and allows moisture to evaporate from the egg, which loses weight during incubation.
At the broad end of the egg is an air sac. As the egg loses weight during incubation, the air sac increases in size.
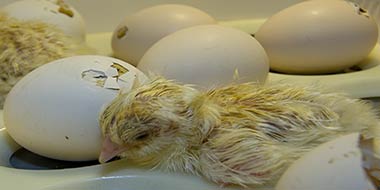
An egg needs to lose the correct amount of moisture during incubation to hatch successfully. The chick will have then developed to the right size and will break through to the air sac to take its first breath of air.
It will go on to ‘pip’ (make a small hole in the shell to breathe) 24 hours before hatching. It needs to have enough room inside the egg to turn around, breaking through the eggshell as it goes, eventually popping the broad end of the egg off and emerging as a chick.
What is humidity?
Humidity is the concentration of water vapour in the air. As you increase the humidity inside the incubator, the rate at which moisture evaporates from the egg decreases. Conversely, as you decrease the humidity, the rate at which the water evaporates from the egg increases.
I often think of it as drying washing outside. It will lose moisture if it’s a dry day and dry quickly. If it’s a damp day, it will hardly dry. If it’s raining (100% humidity), then it will not dry at all!
For a successful hatch, moisture must evaporate from your eggs at just the right rate so that your eggs lose the correct weight (water) over the incubation period.
Incubation humidity
What humidity do we need for hatching eggs?
- Chickens: 99.5°F/37.5°C for 21 days.
- Ducks: 99.5°F/37.5°C for 28 days
- Geese: 99.5°F/37.5°C for 28 to 32 days depending on the species/breed.
- Quail: 99.9°F/37.5°C for 16-23 days depending on species/breed.
You will often see different incubation humidity suggested in books and online. Some variables affect the optimum humidity, and I will explain some of these below, but if you want the quick answer:
During incubation
The optimum average humidity range for forced air incubators at these temperatures over the incubation period, to achieve the correct moisture loss is generally accepted as:
- 45-50% Relative Humidity for chicken and quail eggs
- 50-60% Relative Humidity for ducks and geese.
Humidity during the hatch
We go into what most people call “lockdown” during the last three days of incubation, ready for the hatch. We stop turning eggs, and the humidity inside the incubator (or separate hatcher) needs to be higher to get the best hatch rates. The increased humidity keeps the membrane soft enough for chicks to break out.
Once a chick ‘pips’ making a small hole in the shell to breathe, 24 hours before hatching, the membrane is at risk of drying it out, so be sure to increase humidity about three days before the hatch day.
Raising the humidity for a short time does not make a significant difference to the average moisture loss.
Do not remove the lid of the incubator during this time. Remember, once a chick hatches, the humidity will increase, and this will help the others. If you remove the lid, the moisture is lost!
Initially, chicks live off the yolk they have absorbed before hatching, so they won’t normally eat for 24 hours, so you can leave the first to hatch in the incubator for up to a day if needed.
Increase humidity by 20-25% during the hatch
We must increase the humidity by 20-25% relative humidity during the last 3 days hatching period or 'lockdown'. This is typically 65-75% for most eggs.
Humidity problems
What happens when humidity isn't optimum?
As we deviate from the optimum incubation humidity, we start to see embryos or chicks dying in the shell or abnormal hatchlings.
Low humidity can be a problem in incubators that require you to turn eggs manually, since you are opening the door regularly or in large incubators that are running with only have a few eggs inside.
High humidity is more common. Wet weather outdoors can cause it to increase. Even fully automatic incubators cannot take moisture out of the air, they can only add to the humidity.
Insufficient ventilation is another common problem that causes high humidity. We need sufficient ventilation to provide oxygen to the embryos.
Eggs have lost too much weight which causes the air sac to be too large.
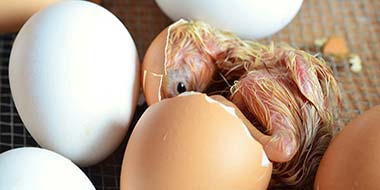
During the early stages of incubation, embryos may stick to the shell membrane and die. Embryos that continue to develop into chicks will be too small and weak.
Chicks are likely to die before hatching or may pip and not hatch. If they do hatch, they will be weak and won’t make it past the first 48 hours. If you help them out, they may have crooked toes or a twisted neck.
The eggs haven’t lost enough weight, which causes the air sac to be too small and the chicks too large for the available space.
- Incubation Troubleshooting Guide – Shows a photo of a duckling that was too large to turn around inside the shell to the hatching position.
Chicks are unable to move into the hatching position, or, if it does manage to manoeuvre itself into the correct position, the membrane will be too rubbery to breakthrough. Think of the air sack like a small balloon: once inflated, it’s easy to pop, but while deflated, it remains thick and rubbery.
If it manages to break through into the air sac, it will not have enough oxygen and will suffocate. Chicks that do hatch will be larger than average.
Water evaporates into the air to cause humidity inside an incubator. There are trays or pans, usually topped up by a container/reservoir of water. It is the surface area of the water exposed to the air that creates the humidity.
Sometimes, manufacturers use a sponge or ‘absorbing pad’ is used to increase the surface area of the water. A few incubators use a separate humidifier (a heater that evaporates the water into the air as warm steam).
By increasing the surface area of water, you can increase the humidity in an incubator. Adding an extra plastic tray, or if you are short on space, a smaller container with a piece of sponge coming out of the top.
Sometimes, as a quick fix, I have used kitchen roll doubled over several times, laid across the bottom and coming out over the sides of a small plastic container. Anything that stays wet and increases surface area.
Remember to use warm water, so you don’t affect the incubator temperature too much.
Ventilation also changes the humidity inside an incubator. Embryos need to breathe, but moisture from the air outside and rate of change of air affect humidity.
By removing or not adding water to your incubator, you will reach the minimum humidity achievable.
The ventilation is the only other control available to us; however, embryos need to breathe, and without sufficient oxygen, they will die.
Ventilation causes air from outside to replace the air in the incubator.
Of course, different locations around the world have different humidity levels outdoors from dry to humid. Here in the UK, running my incubator dry will often result in 40% relative humidity, but during wet spells, this increases.
If you cannot get the humidity low enough, consider the location. If you use your incubator in an outbuilding, there is likely to be a higher fluctuation in the air humidity. A room in the house away from bathrooms, kitchens and sunlight is usually the best.
If you still find the humidity too high, you would need to think about a dehumidifier in the room to remove moisture from the air.
Low humidity is usually less of a problem than high humidity. Most hatching problems (such as chicks being “Dead-in-shell”, fully formed and not hatching) occur because the humidity is too high.
High humidity for the last few days before the hatch is also essential to soften the membranes.
Tip: Fluctuations in humidity
While we must be concerned about fluctuations in temperature (especially high temperatures), don't worry about short term variations in humidity; it's the average humidity over the incubation period that needs to be optimised to achieve the ideal moisture/weight loss.

How to measure humidity
Now we understand what happens when the humidity isn’t correct, let’s look at how we can measure the relative humidity in our incubator.
Relative Humidity (RH) is measured as a percentage. It is the percentage of water vapour in the air.
It can be measured directly off an electronic hygrometer. There are hundreds available with internal or external sensors. Still, unless you pay a reasonable amount of money for one, the sensor can have quite a margin of error, or you can’t calibrate them.
I would always recommend you check and recalibrate if necessary to a wet bulb hygrometer.
Most modern incubators provide a reading. If it is accurate, you may not need to use anything else, but you should calibrate/check it annually.
Many have a calibration procedure in their manual. Usually, this involves wrapping a wet cloth around the sensor and at your operating temperature of 99.5°F/37.5°C to set the humidity reading to 100%.
I always have an additional humidity measurement that I know I can trust. I take dry-bulb and wet-bulb temperatures and calculate relative humidity from an incubation humidity lookup table like below.
Wet and dry bulb measurement
Relative humidity can be measured using a pair of thermometers that provide ‘wet’ and ‘dry’ readings. This method is far more accurate in forced air incubators (incubators with fans circulating air).
Before digital incubators, it was common to use a pair of wet and dry bulb thermometers.

One thermometer reads the air (dry-bulb) temperature. The second reads the wet-bulb temperature, where you dip one end of a cotton wick into a container of water with the other (now wet), around the bulb of the thermometer.
DIY incubation hygrometer
You can make your own hygrometer with a pair of thermometers and a wick to take wet and dry bulb readings.
The wick is no more than a tube of cotton slipped over the bulb of the thermometer, tied with a piece of cotton thread to hold it in place.
You can use a trainer shoe lace like this one as a wick. I attached my thermometers to some wood using cable clips and cut down a paper cup to hold the water. You need to be able to read both thermometers without opening the door of the incubator.

Relative Humidity Table For 99.5°F/37.5°C
I have included a table for 99.5°F/37.5°C air temperature below. Relative humidity can be calculated by measuring the temperature on the wet-bulb thermometer and using this chart.
Wet Bulb Temperature to Relative Humidity

Evaporation from the wet-bulb causes the temperature reading to drop. The only time the readings will be the same is at 100% humidity or when the wick has dried out.
If you need to calculate other wet bulb temperatures for different incubation humidities, this is the relative humidity calculator website I used.
I also found a high-tech solution to monitoring and measuring the temperature and humidity in my incubator and keeping track of the average reading.
SwitchBot
Wireless Temperature & Humidity
I use a Switchbot wireless sensor in my incubator and SwitchBot App on my phone.
I can view temperature and humidity and a graph with AVERAGES since the start of incubation.
I can adjust humidity to get the average right over the incubation period.


What I didn’t expect was to be able to see when chicks hatch; this is because the humidity increases with the moisture during hatching, so you see a spike in humidity on the graph when chicks hatch!
Ventilation and temperature
Variables that affect humidity in our incubators
Now we know how to measure the incubation humidity, we need to be aware of the variables that affect the humidity during incubation.
There are four variables to we need to consider when incubating eggs: Turning, ventilation, temperature and humidity. Turning is necessary, but does not affect humidity like the other two.
Ventilation
Ventilation is the rate of change of air inside the incubator. Manufacturers sometimes pre-set the ventilation with a few holes at the top and bottom; others offer some adjustment with a slider that opens and closes a vent.
Do not to block ventilation holes! They are needed for your eggs to breathe.
The higher the ventilation, the harder it can be to maintain the correct humidity since the humidity of the air entering the incubator is outside of our control.
It is best to follow the instructions for your specific incubator on ventilation.
Temperature
Temperature and relative humidity are linked. If the temperature increases, the relative humidity needs to go down to maintain the same hatching rate.
Let me explain this. The relative humidity is the percentage of water moisture held in the air, and it changes when the air temperature changes.
- As air temperature increases, the air can hold more molecules of water; therefore, the relative humidity decreases.
- When the temperature falls, the air can hold fewer molecules of water, so the relative humidity increases.
This is one reason why a variation exists between incubators for ‘the right’ incubation humidity.
Still-air incubators require a higher operating temperature which means they need to operate at a lower humidity for the same hatch rate.
Humidity
We can increase this by adding water and decrease it (to a point) by not adding water. We cannot reduce it further than a certain point (I call it the background humidity) since incubators do not have the option for drying the air that’s drawn into them!
Egg weight loss during incubation
An alternative method for setting humidity.
As moisture evaporates from eggs during incubation, their weight decreases, so to determine if the humidity is correct, we can weigh a batch of eggs and decide whether they are losing weight faster or slower than expected.
Breeders hatching rare bird eggs often use this method because the optimum humidity can be different from what we would expect for several reasons.
- Age - as birds get older, the shell gets thinner, and the porosity increases. Porosity also increases later on in the season.
- Eggs stored for extended periods - they have already lost some moisture during storage. To optimise your egg storage conditions read my article: How to Collect and Store Hatching Eggs.
- Egg size - smaller eggs (such as bantam eggs) have a faster moisture loss.
Chicken eggs are relatively tolerant compared to some waterfowl eggs, but if you are struggling with hatchability, then you might want to try the weight loss method.
Egg weight loss
With the correct humidity, eggs need to lose 13 to 14% of their weight*. This needs to be over the entire incubation period. All eggs are the same, even if the incubation period is longer.
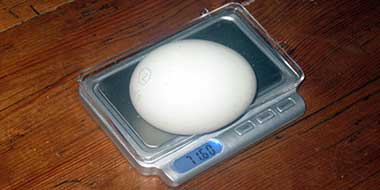
To measure the weight, you can weigh a batch of eggs and record the combined weight on kitchen scales, then divide the measurement by the number of eggs. If all of the eggs are similar, this is a very reliable method to improve hatch rates. Alternatively, if you have accurate weighing scales that can read up to 100 grams weight accurately, then they could be weighed individually.
This is a photo of my digital scales that measures to 0.1 grams accuracy. There are lots available for a reasonable price such as this one.
To make it easy to calculate and graph your egg weight loss, I have included a link to download an Excel spreadsheet from Heka Incubators.
An example is included, but it should be reasonably easy to understand.

- I wrote a separate article on the weight loss method for incubation here, which includes an Excel Spreadsheet for calculating the egg weight loss.
Checking the air-sac size
To cross check incubation humidity
While I would not replace measuring the humidity or weighing eggs to check for weight loss, a good indicator is by monitoring the changing size of the air-sac.
Moisture evaporating through the shell causes the contents of the egg to shrink, increasing the size of the air-sac.
Tip: Candling your eggs
You should candle your eggs at regular periods to check embryo development (so it's easy to check air-sac size at the same time).
It is vital to remove infertile eggs and dead embryos, so they don't turn into rotten eggs and explode inside your incubator, spraying bacteria and mess everywhere!
If you're unsure how to do this, you can read my guide to candling eggs.

You can monitor the size of the air sac by candling your eggs using a bright torch or egg candling device.
When you achieve the proper incubation humidity, the air-sac size will increase according to the diagram below.

- Compare these to your eggs during candling.
- Mark your eggs with a soft pencil so you can monitor progress.
- If the air sack is too small, the incubation humidity is too high. If the air sack is too big, your incubator humidity is too low.
Cooling and spraying waterfowl eggs
Copying mother nature
In the wild, after the first few days of incubation, waterfowl will leave their nest daily to eat and drink, but they will also swim and wash their feathers. When they go back onto the nest, their feathers will be damp, and the moisture will rub off onto their eggs which by now will have cooled.
Some of the more advanced cabinet incubators (such as those made by Brinsea) even have a cooling function that can be set to cool eggs for a set time every 24 hours.
It is possible to increase hatch rates* by cooling but also by misting waterfowl eggs with a water spray to imitate ducks in the wild.
The first few days of incubation are always critical, so it is better not to disturb the eggs until day 5. Set an alarm (you won’t want to forget your eggs), then turn off the incubator and open the door, letting the eggs cool for 10 minutes. Before re-starting incubation, mist the eggs using a houseplant spray set on the fine-mist setting.
*It’s a little controversial. Some books suggest spraying eggs improves the hatch rate; some incubator manufacturers say not to spray eggs.
Conclusions
Hats off to mother nature?

We need thermometers and hygrometers to check the incubator readings we don’t trust, weighing scales, and a computer to calculate egg weight loss.
We need to account for ventilation and turn our eggs. Did I forget to say a bird moves her eggs every half an hour or so?
We use a candling lamp to peer through the shell of our eggs so we can worry about the air sac size.
And then we need this lengthy article to explain incubation humidity…
Maybe the complications of technology could be forgotten by hatching chicks in nature’s way using a broody hen?
Have fun and good luck with your incubating!