Equipment
Focus

In this Equipment Focus, I look at a very basic yet historically very popular incubator made by Brinsea.
The Brinsea Hatchmaker can take around 40 eggs and a popular choice with poultry breeders to be used as a separate hatcher for hatching eggs.
The Hatchmaker is a still air incubator (there is no fan inside, just a heater). It has been around for many years and has become very popular with backyard poultry keepers to use alongside an incubator as a separate hatcher.
If you aren’t familiar with the idea of running a separate hatcher, then I will explain: It is possible to keep one incubator running continuously, adding eggs in small batches as they are laid. A few days before the hatch, when we stop turning eggs and go into “lockdown”, we transfer them into the hatcher, maintained at the high humidity required for the final few days before the eggs hatch. This keeps your main incubator clean and topped up with more eggs.
Once eggs have hatched, the incubator can be wiped clean and sterilised using any suitable incubation disinfectant solution and prepared for the next batch of hatching eggs.
Brinsea Hatchmaker build quality
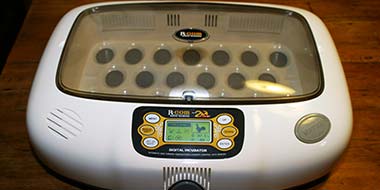
This incubator is well built using a sturdy plastic mould for the base and the lid. There is a perforated aluminium tray that drops into the unit’s base, and eggs are placed onto this tray.
The heater element is a heater wire that is strung around the inside of the lid. The thermometer is mounted into a swivel clip to adjust its height to suit a wide range of egg sizes.
Brinsea incubator’s “proportional electronic system” provides temperature control, and the control is very accurate, unaffected by voltage variations on the mains. There is a 12 Volt version of the Hatchmaker available, too, which would certainly be useful for remote locations or if you live somewhere where there are regular power outages.
Using the Hatchmaker
The Brinsea Hatchmaker holds around 40 eggs, although I have had 42 fairly large eggs in there, which is more than most other similar units available at this price.
Using the Hatchmaker is relatively simple. There are no digital readouts or buttons to worry about. The temperature is set with a small knob on the lid. You can see the glass thermometer through the viewing window to measure the temperature. The height of this can be adjusted according to egg size.
Humidity is created inside the Polyhatch by adding water to circular troughs inside the base-moulding. You have to use a separate hygrometer in order to measure the humidity.

The instructions for the Hatchmaker are available to download as a pdf file here.

Water is added by removing the aluminium plate and pouring it into the base. It is difficult to know exactly how much water is left inside the trough, but you soon get to learn how many days the water will last at the set humidity level before it needs a top-up.
Unfortunately, all of the eggs need to come out to top it up unless you pour the water through the perforated aluminium plate.
Once you know where to pour the water, I found it straightforward to do that without removing eggs.

If you are candling regularly to monitor progress, removing the eggs is less of a problem. Without automatic tuning, you need to turn your hatching eggs at least 3 times daily anyway. This isn’t a problem when using it as a hatcher since the water lasts long enough for the hatch to take place.
Recommended reading:
If you fancy incubating and hatching your own chicks then look no further than "Hatching & Brooding Your Own Chicks" by Gail Damerow. This indispensable reference covers everything you will need to know about incubating, hatching and raising chicks.

Ease of cleaning
After you have hatched a few hatching eggs, you will soon find it a chore cleaning and sterilising your incubator afterwards.
Many forced air incubators on the market have a guard around the fan that stops your chicks from touching the fan blades, but this also, unfortunately, stops you from getting a cloth in and around the fan area for cleaning.
After a while, the fan area becomes mucky and it becomes difficult to maintain good hygiene.

Some incubators put the fan up high on the incubator’s lid; however, you will find that during a hatch, as chicks dry out in the incubator afterwards, there is a large amount of fluff that gets everywhere from the chicks.
The Brinsea Hatchmaker is really easy to clean and can be cleaned, sterilised and back in service in about 15 minutes. The base is straightforward to clean. Inside the lid, the heater wire is spaced sufficiently away from the lid’s top to get a damp cloth behind it (but remember to unplug the incubator and follow the manufacturer’s instructions since water and electricity don’t mix!)
Conclusions
The Brinsea Hatchmaker can be used as an incubator; however, the lack of automatic turning makes it more suitable for a hatcher. The Brinsea Polyhatch is a similar incubator that also comes with an automatic turner. If you think of using the Hatchmaker as an incubator more than a hatcher, the Polyhatch should also be considered.

When used as a hatcher, the Brinsea Hatchmaker really worked well since incubators tend to get very messy, very quickly, and forced air incubators get a lot of fluff and mess around the fan, making sterilising difficult. If used as a still air incubator, the Brinsea Hatchmaker has a great capacity for reasonably large hatches and providing you are happy with turning your own eggs; it is a very economical way to hatch a good number of eggs.
"For me, the Hatchmaker has been tried and tested repeatedly, mainly as a hatcher but also at 'peak' times of the year, as an incubator and has been extremely reliable, and it has very little to go wrong with it."
Tim Daniels Tweet
Update in June 2015. Brinsea does not make the Hatchmaker anymore, although their website does offer a spare temperature control PCB.
Useful guides:
- Setting up your Incubator - How to set up an incubator and monitor temperature and humidity for a successful hatch.
- Incubation Humidity - What is the correct incubation humidity for hatching eggs?
- How to Collect and Store Hatching Eggs? - With the correct conditions, you can store hatching eggs for up to 2 weeks and still get excellent results!